
Introduction
In the digital age, where data breaches and cyber threats lurk at every corner, securing your .NET REST APIs has never been more critical.
As developers, it's our duty to fortify our applications against the myriad of vulnerabilities that can compromise user data and system integrity.
This article embarks on a comprehensive journey into the world of .NET REST API security, unpacking the essential practices that every developer should implement to shield their applications.
From robust authentication mechanisms like JWT and OAuth to the implementation of SSL/TLS for encryption, we dive deep into each component of security. Additionally, we explore role-based authorization to finely control access and share strategies to thwart common security threats such as SQL Injection and XSS.
Complete with code examples, this guide aims to equip you with the knowledge and tools to not only secure your .NET REST APIs but also to understand the underlying principles of web security. Whether you're a seasoned developer or new to the .NET framework, this article is your gateway to building more secure, resilient, and trustworthy applications.
Setup
Here's a step-by-step guide to get your environment ready and your first project off the ground:
Step 1: Prerequisites
Ensure you have the following installed:
- Visual Studio 2022 or later: Make sure you have the latest version to work with .NET 6. Visual Studio offers a rich development environment with tools and features that simplify the development process.
- .NET 6 (or 7 or 8) SDK: Visual Studio should prompt you to install this during setup if it's not already installed. You can also download it directly from the Microsoft website.
Step 2: Create a New Project
- Launch Visual Studio: Open Visual Studio and select "Create a new project" from the Get started screen.
- Choose a Project Template: In the Create a new project window, search for "ASP.NET Core Web API". Select the template named "ASP.NET Core Web API" and click "Next".
- Configure Your Project:
- Project Name: Enter a name for your project. This name will be used as the Assembly name as well as the default Namespace.
- Location: Choose where you'd like your project files to be stored.
- Solution Name: By default, it matches your project name, but you can change it if you prefer.
- Click "Next" once you're done.
Step 3: Additional Configurations
- Framework Selection: You'll be prompted to choose a framework. Select ".NET 6.0” or higher from the dropdown menu.
- Authentication Type (Optional): If your API requires user authentication, you can configure it here by clicking on "Change" under Authentication. For most APIs, "None" is a suitable default. We will implement this later.
- Configure for HTTPS: Ensure that the "Configure for HTTPS" checkbox is selected. This ensures your API is set up to use HTTPS by default, enhancing security.
- Enable Docker Support (Optional): If you plan to deploy your API in containers, you can check "Enable Docker Support". This is optional and can be configured later. We will not use it in this article.
- Enable OpenAPI Support: Leave this checked. OpenAPI (Swagger) is instrumental in documenting your API and provides a UI for testing your API endpoints.
Step 4: Run Your API
To run your API, simply press F5 or click the "IIS Express" button in Visual Studio. This launches your API in your default web browser, typically navigating to a Swagger UI page that lists all available endpoints.
And there you have it!
You've successfully set up a Web API project on .NET using Visual Studio.
Let’s focus on security now.

How Do I Know My API is Not Secure?
Identifying security vulnerabilities in your API is crucial to protect your data and users from potential threats.
While there are several signs that may indicate your API's security could be compromised, such as unexpected data breaches or unauthorized access, proactive measures are essential for early detection and prevention.
In this context, leveraging tools to assess and enhance your API security is a fundamental approach.
Recognizing Vulnerabilities
Before diving into the tools, it's essential to understand common vulnerabilities that can affect your API, including:
- Lack of Authentication/Authorization: If endpoints that should be protected can be accessed without authentication or proper authorization, your API is vulnerable.
- Insecure Data Transmission: Not using HTTPS or misconfiguring SSL/TLS can expose data to interception during transit.
- Injection Flaws: SQL injection, command injection, or other forms where an attacker can send malicious input to be executed by the system.
- Improper Error Handling: Revealing too much information in error messages can provide attackers with insights into your API's structure or system.
- Misconfigured Security Headers: Security headers like Content Security Policy (CSP) or X-Content-Type-Options play a crucial role in protecting against certain attacks. Incorrect configurations can leave your API vulnerable.
I often quote myself: "You can't fix what you don't know if it needs to be fixed", because I think that, in this case, API security should be checked regularly.
In this blog we will use Treblle tools to test API security.To be able to follow, be sure to:
- Register/Login to Treblle Web Monitoring App.
- Check Api Insights app
- (Optional): Read this article on how to use Api Insights extension directly in Visual Studio Code.
Authentication and Authorization
Authentication is a critical aspect of API security, serving as the gatekeeper that ensures only authorized users can access your resources. It confirms the identity of users or systems before allowing access to your API.
There are several methods to implement authentication, each with its unique advantages and use cases. Let's delve deeper into my preferred authentication method - JSON Web Tokens (JWT).

Authentication - JSON Web Tokens (JWT)
JSON Web Tokens (JWT) are an open standard (RFC 7519) that defines a compact and self-contained way for securely transmitting information between parties as a JSON object. This information can be verified and trusted because it is digitally signed.
JWTs can be signed using a secret (with the HMAC algorithm) or a public/private key pair using RSA or ECDSA.
How JWT Works:
Creation: When a user logs in using their credentials, the server generates a JWT with a secret key and returns this token to the user.
Transmission: The client then includes this token in the HTTP Authorization header in subsequent requests to the server.
Verification: The server verifies the token's signature and, if valid, allows access to the requested resource.
Benefits:
Statelessness: JWTs are self-contained, carrying all the necessary information about the user. This makes the server stateless, as it does not need to keep a session store.
Security: The token is signed and can be encrypted, ensuring the data's integrity and confidentiality.
Scalability: Being stateless enables better scalability as the application grows.
How to implement it in .NET?
A typical implementation in a .NET application involves configuring the JWT middleware in Program.cs, setting up the token validation parameters as shown in the setup section above.
- Install Necessary Packages: First, add the Microsoft.AspNetCore.Authentication.JwtBearer package to your project.
- Configure Services: In your Program.cs, add JWT authentication to the service collection.
builder.Services.AddAuthentication(JwtBearerDefaults.AuthenticationScheme)
    .AddJwtBearer(options =>
    {
        options.TokenValidationParameters = new TokenValidationParameters
        {
            ValidateIssuer = true,
            ValidateAudience = true,
            ValidateLifetime = true,
            ValidateIssuerSigningKey = true,
            ValidIssuer = Configuration["Jwt:Issuer"],
            ValidAudience = Configuration["Jwt:Audience"],
            IssuerSigningKey = new SymmetricSecurityKey(Encoding.UTF8.GetBytes(Configuration["Jwt:Key"]))
        };
    });
- Apply Authentication Middleware:
app.UseAuthentication();
app.UseAuthorization();
Generating Tokens: Create a method to generate JWT tokens when users log in.
private string GenerateJwtToken(string username)
{
    var securityKey = new SymmetricSecurityKey(Encoding.UTF8.GetBytes(Configuration["Jwt:Key"]));
    var credentials = new SigningCredentials(securityKey, SecurityAlgorithms.HmacSha256);

    var token = new JwtSecurityToken(Configuration["Jwt:Issuer"],
                                     Configuration["Jwt:Audience"],
                                     null,
                                     expires: DateTime.Now.AddMinutes(120),
                                     signingCredentials: credentials);

    return new JwtSecurityTokenHandler().WriteToken(token);
}
Role-Based Authorization
Role-Based Authorization is a security mechanism for enforcing access controls in an application based on the roles assigned to users. It is a straightforward yet powerful way to manage what resources a user can access and the actions they can perform.
This method involves assigning permissions to specific roles rather than individual users, simplifying the management of user permissions, especially in large applications or organizations.
Understanding Role-Based Authorization
At its core, role-based authorization operates on three basic concepts:
- Users: Individuals who interact with the application.
- Roles: Labels or designations assigned to users that represent their authority level, job function, or group membership within the application.
- Permissions: Specific rights or access levels to resources and operations within the application.
How It Works
- Role Assignment: When a user is created or added to the system, they are assigned one or more roles. Each role encapsulates the permissions associated with it.
- Permission Check: When a user attempts to perform an action or access a resource, the application checks if the user's roles include the necessary permissions to perform the requested action.
- Access Grant or Deny: If the user has a role with the appropriate permissions, access is granted; otherwise, it is denied.
Implementing Role-Based Authorization in .NET
In a .NET application, role-based authorization can be implemented using built-in attributes and services that integrate seamlessly with the ASP.NET Core identity system. Here's a detailed look at how to set it up:
- Defining Roles
Roles can be predefined in your application or dynamically managed through an admin interface. For instance, you might have roles like "Admin", "Editor", and "Viewer", each with different permissions.
- Assigning Roles to Users
When creating or managing users, assign roles to them based on their responsibilities. In ASP.NET Core, roles can be managed using the RoleManager<T> class, where T is your role class.
- Enforcing Role-Based Access
You can enforce role-based access control in your controllers and actions using the [Authorize] attribute. Here are some examples:
- Restricting Access to a Controller:
To restrict access to an entire controller to users with a specific role, you can decorate the controller class with the [Authorize] attribute specifying the role:
[Authorize(Roles = "Admin")]
public class AdminController : Controller
{
    // All actions here are limited to users with the "Admin" role
}
- Restricting Access to an Action:
To restrict access to a specific action within a controller, apply the [Authorize] attribute to the action method:
public class DocumentsController : Controller
{
    [Authorize(Roles = "Editor, Admin")]
    public IActionResult Edit(int id)
    {
        // Only users with "Editor" or "Admin" roles can access this action
        return View();
    }
}
- Role Checks in Code
Sometimes, you may need to perform role checks within your methods to conditionally perform actions. This can be done using the User.IsInRole method:
if (User.IsInRole("Admin"))
{
    // Perform action available only to Admins
}
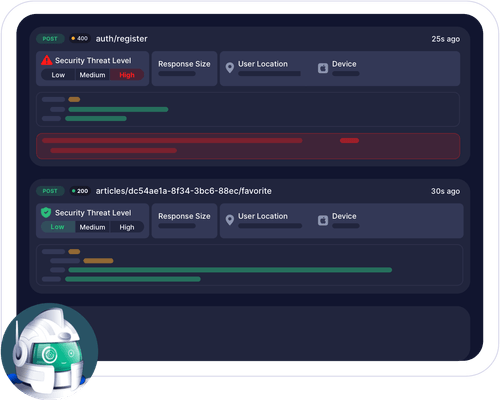
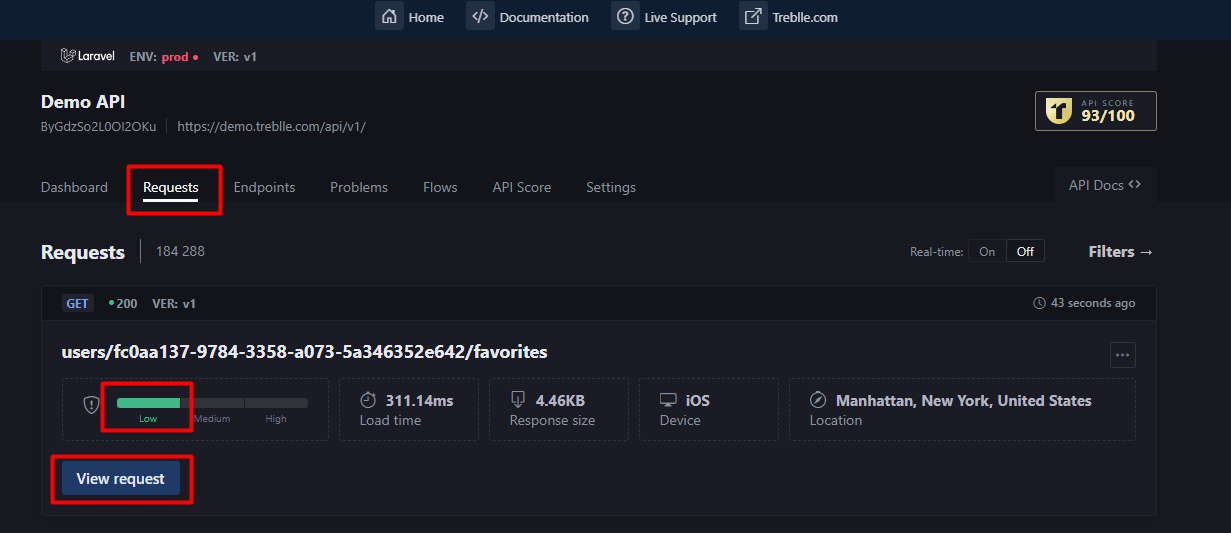
How to test this in Treblle?
In the Treblle monitoring application, it is possible to see for each request which of the security items are implemented well and which are bad. It is necessary to click on the View Request button, which takes you to complete analysis of the specific request.
In the Request Details->Auth tab we can see what Treblle tells us about only the Authentication of this request. In our Demo case, we can see that Request does not have authentication at all, which is certainly not good.
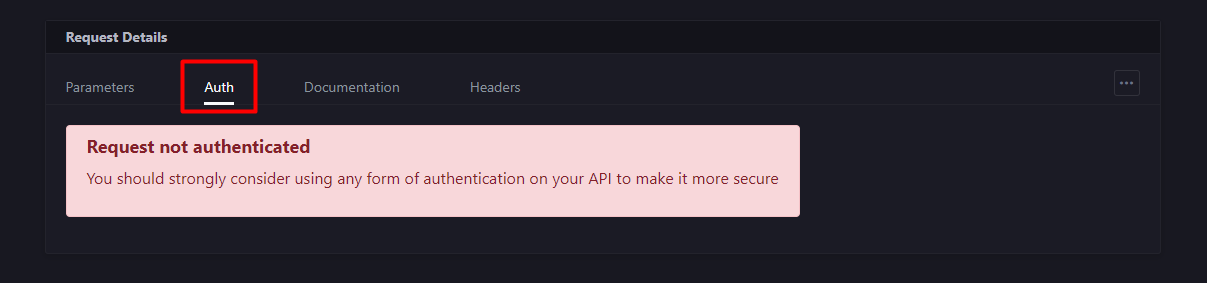
But that's not all.
At the end of the report, we have a complete Security Audit, which gives us a detailed view of the impact of a certain security breach, as well as the status (Pass / Fail).
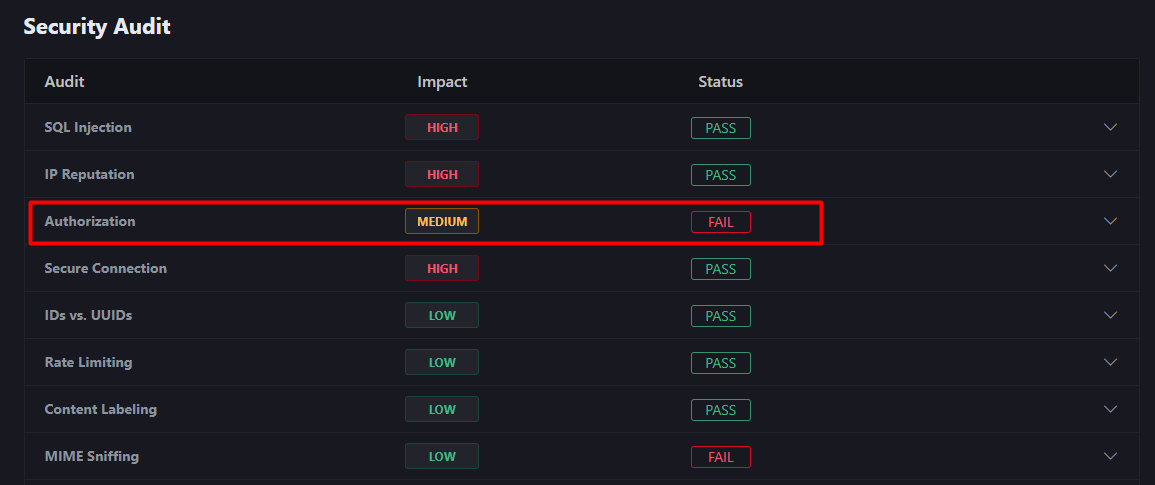
In our example, we can see it for authorization.
In this way, we can see what needs to be worked on regarding the security of our API.

Implementing SSL/TLS
Implementing SSL/TLS (Secure Sockets Layer/Transport Layer Security) is essential for securing communications between clients and servers. This security protocol ensures that data transmitted over the internet is encrypted, making it difficult for attackers to intercept or tamper with the information.
Implementing SSL/TLS is a critical step in protecting sensitive data, such as user credentials, personal information, and payment details. Below, we delve into the details of implementing SSL/TLS, focusing on a .NET environment.
Understanding SSL/TLS
SSL/TLS works by establishing an encrypted link between a web server and a browser, ensuring that all data passed between them remains private and integral. This process involves the use of digital certificates, which serve to verify the identity of the parties involved in communication.
Key Concepts of SSL/TLS
- Encryption: SSL/TLS uses asymmetric encryption for establishing a secure connection and symmetric encryption for the actual data transfer, ensuring that the information is unreadable to anyone who intercepts it.
- Certificates: Digital certificates, issued by Certificate Authorities (CAs), verify the identity of the server and sometimes the client, fostering trust between communicating parties.
- Handshake Protocol: The SSL/TLS handshake protocol establishes a secure connection before any data is transferred. It involves negotiation of encryption algorithms and the exchange of cryptographic keys.
Implementing SSL/TLS in .NET Applications
For .NET applications, particularly those using ASP.NET Core, enabling SSL/TLS is straightforward. Here's how to do it:
- HTTPS Redirection Middleware: Ensure your application redirects HTTP requests to HTTPS by adding the HTTPS Redirection middleware in your Program.cs file:
app.UseHttpsRedirection();
// Other middleware
- Configuring Kestrel: If you're using Kestrel as your web server, configure it to use HTTPS by specifying the certificate in the appsettings.json or directly in code. For example, to configure appsettings.json:
{
  "Kestrel": {
    "Endpoints": {
      "Https": {
        "Url": "https://*:5001",
        "Certificate": {
          "Path": "path/to/your/certificate.pfx",
          "Password": "your_certificate_password"
        }
      }
    }
  }
}
And ensure your Program.cs is configured to use these settings:
.UseKestrel(options =>
{
    options.ConfigureEndpoints();
});
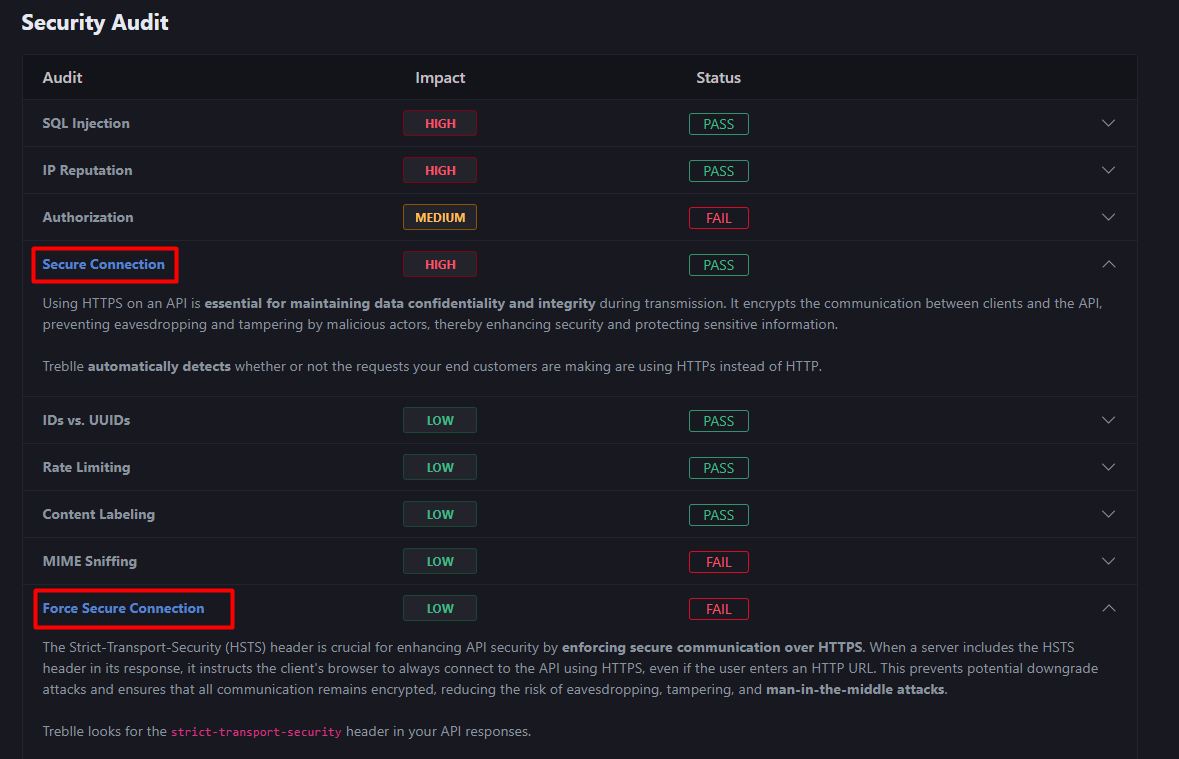
Treblle Audit for Secure Connection
In the same way as for authentication/authorization, the Security Audit shows us details for a secure connection. Look for Secure Connection and Force Secure Connection:
Preventing Common Security Threats
Preventing common security threats is crucial for maintaining the integrity, confidentiality, and availability of your .NET applications.
Beyond the basics of secure coding practices, understanding specific threats and how to mitigate them is vital.
Here, we'll delve into common security threats, including SQL Injection, Cross-Site Scripting (XSS), and introduce additional threats like Cross-Site Request Forgery (CSRF) and Insecure Direct Object References (IDOR), providing strategies and code examples to prevent them.
SQL Injection
SQL Injection attacks occur when an attacker can manipulate a SQL query through user input. This can lead to unauthorized access to or manipulation of database information.
Prevention:
Parameterized Queries: Always use parameterized queries instead of concatenating SQL strings with user input.
Example:
var command = "SELECT * FROM users WHERE username = @username AND password = @password";
var sqlCommand = new SqlCommand(command, connection);
sqlCommand.Parameters.AddWithValue("@username", username);
sqlCommand.Parameters.AddWithValue("@password", password);
Entity Framework: In .NET we don’t have this problem too much, because we have Entity Framework. Using an ORM like Entity Framework also prevents SQL Injection as it uses parameterized queries under the hood.
Cross-Site Scripting (XSS)
XSS attacks involve injecting malicious scripts into web pages viewed by other users, exploiting the trust a user has for a particular site.
Prevention:
Encoding Output: Encode data before output to the browser, especially data that comes from user inputs.
Example in Razor View:
@Html.Encode(Model.Content)
- Content Security Policy (CSP): Implement CSP headers to reduce the risk of XSS by specifying which dynamic resources are allowed to load.
Example of CSP implementation:
// CSP Middleware
   	 app.Use(async (context, next) =>
   	 {
        		context.Response.Headers.Add("Content-Security-Policy",
             "default-src 'self'; script-src 'self' https://apis.google.com; style-src 'self' https://fonts.googleapis.com; img-src 'self' https://images.unsplash.com; font-src 'self' https://fonts.gstatic.com; frame-src 'none';");
        await next();
    });
More details you can find here.
Cross-Site Request Forgery (CSRF)
CSRF attacks trick the victim into submitting a malicious request. It leverages the identity and privileges of the victim to perform an undesired function on their behalf.
Prevention:
Anti-CSRF Tokens: ASP.NET Core includes built-in support for anti-CSRF tokens in forms.
Example:
<form asp-action="ChangePassword">
    <input type="hidden" asp-antiforgery="true" />
    <!-- Form fields here -->
</form>
Additional Threats – From Headers
Security headers are HTTP response headers that provide an additional layer of security to web applications. They help to protect against attacks such as cross-site scripting (XSS), clickjacking, and more.
Implementing security headers is an important step towards securing your .NET application.Here is the Security Headers list which should be consider:
• X-Frame-Options
• X-Xss-Protection
• X-Content-Type-Options
• Strict-Transport-Security
• Referrer-Policy
• Content-Security-Policy
• Permissions-Policy
• Server
• X-Permitted-Cross-Domain-Policies
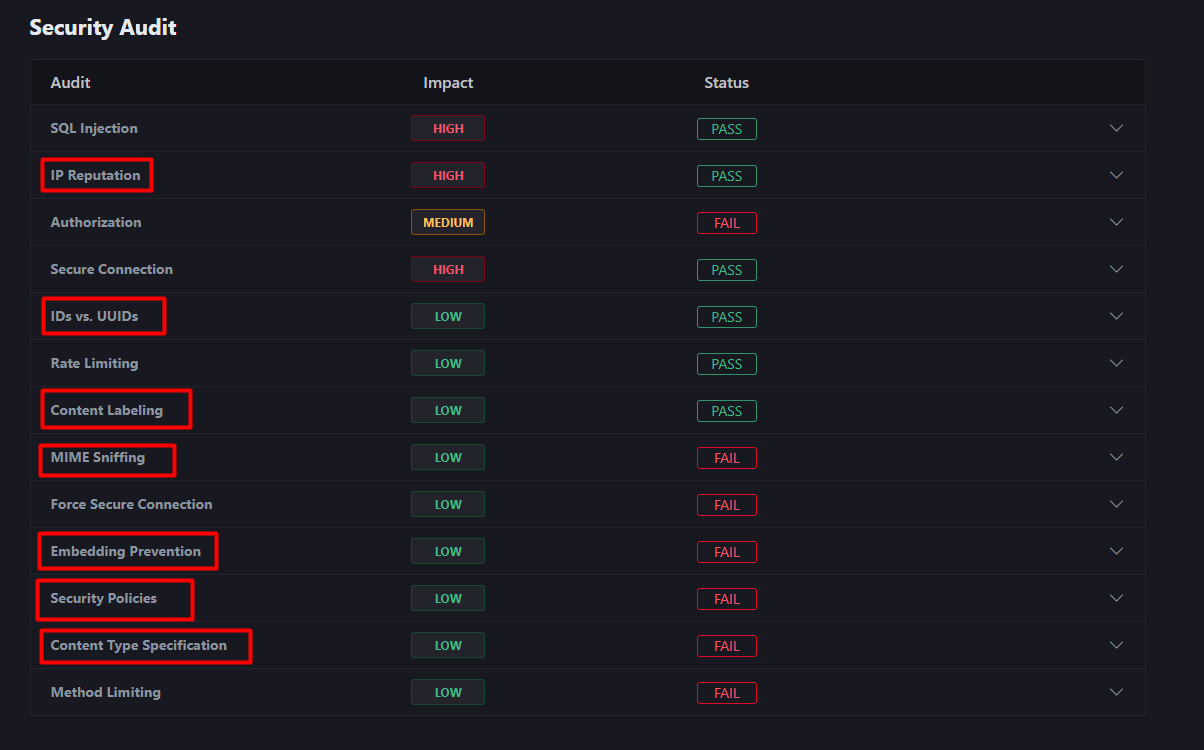
Treblle Security Audit
As for all these additional security things to pay attention to, a lot of them are present in the same audit.
Conclusion
Securing your .NET REST API is not just the best practice; it's an essential part of responsible software development. As we've explored, there are several layers to consider, from authenticating users with JWT to encrypting data with SSL/TLS and guarding against common vulnerabilities like SQL Injection and XSS.
Each layer serves as a barrier, making it harder for unauthorized users to access or compromise your system.
Implementing a Content Security Policy (CSP) further tightens your defense, specifically against XSS attacks, by controlling what resources can be loaded on your pages.
This, along with role-based authorization, ensures that users can only access resources appropriate to their roles, adding a layer of control over what actions each user can perform.
But beyond these specific strategies, the real takeaway is the mindset. Security isn't a one-time checkbox; it's an ongoing commitment. It evolves as new vulnerabilities are discovered and as your application grows. Regularly updating your understanding of security best practices, testing your application for vulnerabilities, and applying the latest security patches are all part of this commitment.
And yes, don’t forget to measure your security threats using Treblle.


