

Security might not be your top priority when building your first REST API,especially if you’re just getting started with a basic setup like creating a simple REST API with JSON. However, even in early development stages, it's crucial to implement basic authentication to prevent unauthorized access and potential abuse. An API key offers a straightforward method to control access, ensuring that only authorized clients can interact with your API.
In this article, we will learn how to secure your first REST API with an API key, and I will also share some additional tips and best practices for securing your API key and REST API.
Refreshing the basics: What is an API Key?
An API key is a unique alphanumeric string that serves as a simple form of authentication and authorization for applications interacting with APIs. It identifies the calling project or application, enabling API providers to control and monitor access to their services.
Key Characteristics
- Identification: API keys uniquely identify the application or project making the API request, not the end-user.
- Authentication: They act as a credential to authenticate the calling application, ensuring only authorized applications can access the API.
- Authorization: API keys can be associated with specific permissions, allowing access to certain API endpoints or functionalities.
Now that we have refreshed our basics, let’s get into the details.
How API Key Authentication Works
API key authentication is a straightforward method to secure RESTful APIs, ensuring that only authorized applications can access your services. Here's a breakdown of how it functions:
1. API Key Generation
When a client application registers to use your API, the server generates a unique API key—a long, random string that serves as a credential. This key is associated with the client's identity and permissions.
2. Client Sends API Key with Requests
The client includes the API key in each API request, typically in the request header. This allows the server to identify and authenticate the source of the request.
Example using curl:
curl -H "x-api-key: YOUR_API_KEY" https://api.yourservice.com/endpoint3. Server Validates the API Key
Upon receiving a request, the server checks the provided API key against its database:
- Existence: Does the API key exist?
- Status: Is the key active or has it been revoked?
- Permissions: What resources or actions is this key authorized to access?
If the API key passes all checks, the server processes the request. Otherwise, it responds with an appropriate error message, such as 401 Unauthorized. To improve your API’s resilience and clarity, follow these best practices for REST API error handling.
4. Access Control and Monitoring
API keys enable you to implement fine-grained access control:
- Rate Limiting: Restricts the number of requests a client can make in a given time frame.
- Usage Tracking: Monitor how clients use your API for analytics and billing purposes.
- Scope Limitation: Define what parts of the API a key can access.
By associating API keys with specific clients, you can track usage patterns and detect anomalies, enhancing security and performance.
5. Security Considerations
While API keys are easy to implement, they come with security considerations:
- Transmission Security: Always use HTTPS to encrypt API requests, preventing key interception.
- Storage: Store API keys securely on the server, preferably hashed, to prevent unauthorized access.
- Rotation: Regularly rotate API keys and provide mechanisms for clients to regenerate keys if compromised.
We will discuss the security considerations in detail later in this article. But for a brief overview, it's also advisable to restrict API keys to specific IP addresses or referrer URLs when possible, which adds an extra layer of security.
How to Set Up API Key Authentication in REST API
1. Generate and Store Your API Key
Before your API can authenticate clients, you need a unique, hard-to-guess token and a secure place to keep it.
Create a secure key
- Generate a random string (e.g., a 32-byte hex token) for each client.
- Store it in a
.envfile at your project root:
API_KEY=your_generated_api_keyProtect your secrets
- Add
.envto your.gitignoreto prevent commits of sensitive data. - Provide an
.env.examplewith placeholder values for onboarding.
2. Install and Configure dotenv
You’ll use dotenvto load your API key into process.env without hard-coding secrets.
Install the package
npm install dotenvThis adds the ability to read .env files in development
Load environment variables
At the very top of your entry file (app.js or index.js), add:
require('dotenv').config();Now process.env.API_KEY holds your key; no extra parsing needed
3. Create Middleware for API Key Validation
Encapsulate your authentication logic in middleware so it’s reusable and maintainable.
Read the x-api-key header
Fetch the key from req.headers['x-api-key'] in your middleware function.
Compare to the stored key
Check if the provided key matches process.env.API_KEY; return 401 Unauthorized if it doesn’t
// middleware/apiKeyAuth.js
module.exports = function (req, res, next) {
  const clientKey = req.headers['x-api-key'];
  if (!clientKey || clientKey !== process.env.API_KEY) {
    return res.status(401).json({ error: 'Unauthorized' });
  }
  next();
};
- Reads the
x-api-keyheader from each request - Compares it to the value in
process.env.API_KEY - Rejects invalid or missing keys with
HTTP 401
4. Apply the Middleware to Your Routes
Decide whether to lock down all endpoints or only specific ones. When designing your routes, refer to this REST API endpoint design guide to follow naming conventions and structure them effectively for future scalability.
Global Protection
const express = require('express');
const apiKeyAuth = require('./middleware/apiKeyAuth');
const app = express();

app.use(apiKeyAuth); // All routes now require a valid API key

app.get('/data', (req, res) => {
  res.json({ message: 'Secure data' });
});
Route-Specific Protection
app.get('/public', (req, res) => {
  res.send('This is open to everyone');
});

app.get('/private', apiKeyAuth, (req, res) => {
  res.json({ message: 'Protected data' });
});
5. Test Your Implementation
Use Aspen, Treblle's API testing tool to verify your API and ensure your API behaves as expected for both authorized and unauthorized requests:
# With valid key
curl -H "x-api-key: $API_KEY" http://localhost:3000/data

# Missing or invalid key
curl http://localhost:3000/data
# → 401 Unauthorized
6. Enforce HTTPS for Secure Transmission
Always serve your API over HTTPS to protect the API key (and other credentials) in transit. Plain HTTP leaves keys vulnerable to interception.
7. Best Practice: Add Rate Limiting & Usage Tracking
To further harden your API:
- Rate Limiting: Prevent abuse by capping requests per minute (e.g., with
express-rate-limit) - Usage Analytics: Use tools like Treblle to log every API request for monitoring and anomaly detection.
Sending the API Key in Requests
In this section, you’ll learn the best practices for sending API keys with each request, ensuring secure transport via HTTP headers, seeing concrete examples in Aspen, and understanding common pitfalls to avoid.
Preferred Header Usage: Use a dedicated header or the Authorization header
Most REST APIs expect API keys in a custom header (e.g., x-api-key) or in the standard Authorization header with a scheme like Bearer. Custom headers keep your authentication method explicit and separate from other token types.
Using the Authorization: Bearer YOUR_API_KEY pattern aligns your API key usage with OAuth-style tokens, simplifying integration when you later adopt JWTs or OAuth2.
Why headers over query parameters
Headers are never logged in URLs by default and aren’t stored in browser history, reducing accidental exposure. Query parameters, in contrast, appear in access logs and can be cached by intermediaries, making them a known security risk for API keys.
Example Using Aspen
Aspen is a free, zero-trust, native macOS HTTP client from Treblle, designed for rapid REST API testing with AI-powered assistance. And here’s why it might become your favorite API tool.
- Download & Launch Aspen: Install the app from getaspen.io or the Apple store on your Mac.
- Create an Environment: Click the Environment section on the top right and click on add Environment, name your new Environment (local), and add Key to
x-api-keyand Value. Click Save, and head back to Aspen’s home screen.
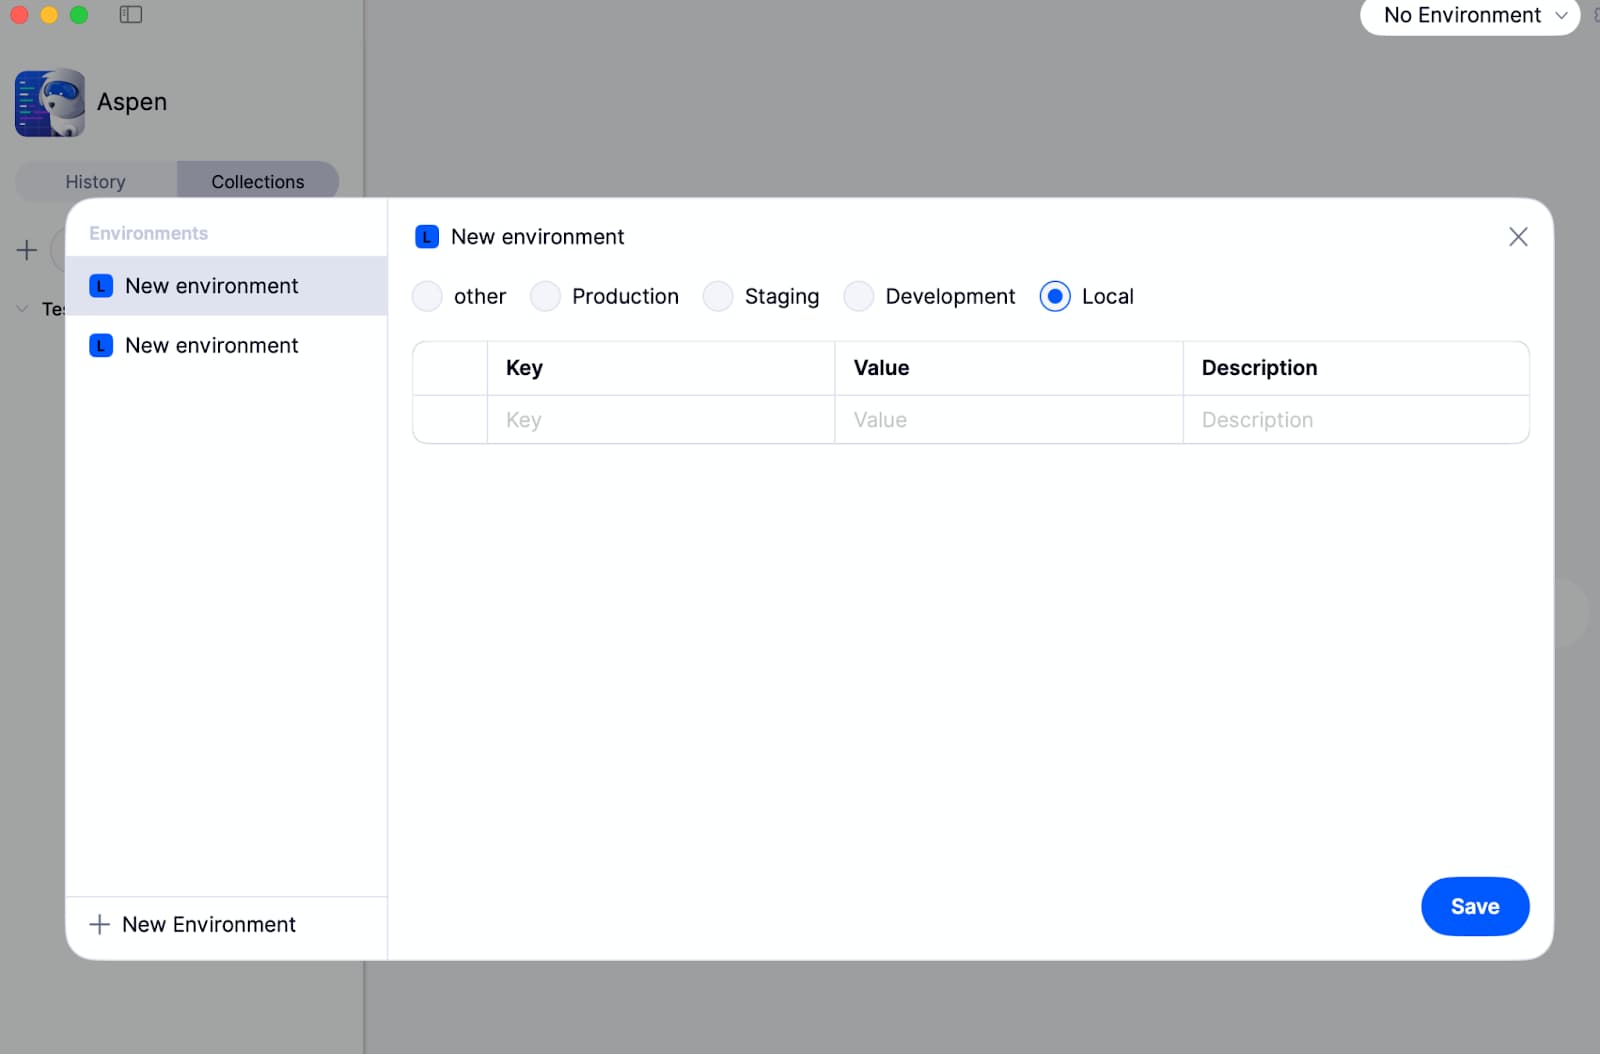
- Run the Test: Now, make a new request, enter your HTTP method and endpoint URL. If you’re unsure which HTTP method to use—
GET,POST,PUT,DELETE—check out this guide on HTTP methods for REST APIs to ensure you’re following conventions. - Execute & Inspect: Hit Send and verify a successful response (e.g., HTTP 200). If the key is invalid or missing, Aspen shows the
401 Unauthorizederror.
Common Mistakes to Avoid
- Query Parameter Exposure: Placing API keys in URLs exposes them in logs and caches. Always prefer headers.
- Embedding in Frontend Code: Hard-coding keys in JavaScript or mobile apps makes them accessible to anyone with client access. Store keys on servers or in secure vaults.
- Omitting HTTPS: Transmitting keys over HTTP risks interception by man-in-the-middle attacks. Enforce HTTPS so headers (and your API key) remain encrypted.
Tips for Managing API Keys Safely
API keys are critical credentials that grant access to your services. Proper management ensures security and prevents unauthorized access.
1. Generate Strong, Unique API Keys
Create API keys using cryptographically secure random generators. Avoid predictable patterns to reduce the risk of brute-force attacks.
2. Store API Keys Securely
Never hard-code API keys into your application's source code. Instead, store them in environment variables or use a dedicated secrets management service.
3. Rotate API Keys Regularly
Implement a key rotation policy to minimize the impact of a compromised key. Regular rotation limits the window of opportunity for misuse.
4. Restrict API Key Permissions
Apply the principle of least privilege by assigning only necessary permissions to each API key. This limits potential damage if a key is compromised.
5. Monitor and Log API Key Usage
Track API key usage to detect unusual patterns that may indicate misuse. Implement rate limiting to prevent abuse and ensure fair usage.
6. Avoid Client-Side Exposure
Do not expose API keys in client-side code, such as JavaScript or mobile applications. Instead, route requests through a secure backend server.
7. Use HTTPS for All API Communications
Ensure all API requests are made over HTTPS to encrypt data in transit, protecting API keys from interception.
8. Implement Access Controls
Restrict API key usage to specific IP addresses, referrer URLs, or applications. This adds a layer of security by limiting where keys can be used.
9. Disable Unused API Keys
Regularly audit your API keys and deactivate any that are no longer in use. This reduces the attack surface and prevents unauthorized access through forgotten keys.
10. Educate Your Development Team
Ensure all team members understand the importance of API key security and follow best practices to prevent accidental exposure.
What API Keys Don’t Do
While API keys are a straightforward method for authenticating applications, they have several limitations that developers should be aware of:
1. Lack of User-Level Granularity
API keys authenticate the calling application, not individual users. This means:
- You can't distinguish between different users of the same application.
- Implementing user-specific permissions or access controls is not feasible with API keys alone.
For user-level authentication and authorization, protocols like OAuth 2.0 are more appropriate.
2. No Built-in Expiration or Revocation Mechanism
API keys typically do not expire automatically, and revoking them requires manual intervention. This poses risks:
- If a key is compromised, it can be used indefinitely until it's manually revoked.
- There's no native support for rotating keys or setting expiration policies.
Implementing key rotation and expiration requires additional infrastructure and processes.
3. Limited Access Control and Scope
API keys often grant broad access to the API, lacking fine-grained control:
- Difficult to restrict access to specific endpoints or actions.
- Challenging to enforce read/write permissions or limit access based on roles.
Advanced authorization frameworks like OAuth 2.0 provide scopes and roles to manage access more precisely.
4. No Encryption or Secure Transmission by Default
Systems transmit API keys in plaintext unless developers implement additional security measures such as:
- Without HTTPS, keys can be intercepted during transmission.
- API keys do not encrypt the data during transmission.
Always use HTTPS to encrypt API requests and responses, ensuring the confidentiality and integrity of the data.
5. Susceptibility to Exposure
API keys can be inadvertently exposed through:
- Hard-coded keys in source code repositories.
- Inclusion in client-side code, such as JavaScript, for web applications.
- Logging mechanisms that capture headers or query parameters containing keys.
To mitigate these risks:
- Store keys securely, using environment variables or secrets management systems.
- Avoid exposing keys in client-side code; route requests through a secure backend instead.
- Implement monitoring and alerting to detect unauthorized use of API keys.
Conclusion
Implementing API key authentication is a crucial first step in securing your REST API. It provides a straightforward method to control access and monitor usage. However, as your application scales and security needs evolve, it's essential to consider more robust authentication mechanisms like OAuth 2.0 or JWTs.
For developers seeking an efficient and privacy-focused tool to test and manage their APIs, Aspen by Treblle offers a compelling solution. Aspen is a free, native macOS application explicitly designed for REST API testing. It requires no login, ensuring your data remains local and secure. With its AI-powered assistant, Alfred, Aspen can generate data models, OpenAPI specifications, and integration code, streamlining your development workflow.


