
Agenda:
- Versioning your API
- Using proper HTTP methods
- Securing your API
- Caching responses
- User Input Validation
- Exception Handling
- Documenting your API
Prerequisites:
Introduction
When developing an API, programmers need to consider various factors beyond just implementing basic functionality. They must address concerns like versioning, security, performance, error handling, and documentation. By incorporating best practices in these areas, programmers can ensure the reliability, scalability, and usability of their APIs.
This article aims to provide a comprehensive overview of the best practices that programmers should follow when creating an API. Whether you are working with .NET 6 Web API or any other framework, these practices are essential to deliver a well-designed and robust API.
Versioning your API
What is API versioning?
API versioning is a technique used to manage changes in an API while maintaining backward compatibility for existing clients. It allows developers to introduce new features, fix bugs, or make other modifications to the API without impacting the functionality of existing integrations.
API is software. Every piece of the software needs updates at some point. When you are creating some updates on your API, you need to ensure that the changes don’t affect your API consumers (users). To ensure that, you need to introduce API versioning.
Why do you need API versioning?
You need API versioning because it ensures compatibility, empowers flexible adoption of changes, provides controlled and documented modifications, enables coexistence of multiple versions, and grants granular control over the lifecycle of your API, resulting in successful and efficient software development.
If you're aiming to develop robust and scalable web applications, consider hiring an ASP.NET developer from Toptal. With their deep expertise in creating high-performance solutions, Toptal's ASP.NET professionals are equipped to deliver cutting-edge applications that cater to complex business needs, ensuring top companies and startups achieve their technological goals efficiently.
The 3 most important reasons:
- Backward compatibility: It ensures that clients can continue using the older version while new clients can take advantage of the updated features.
- API evolution: As your API evolves over time, versioning allows you to introduce new features, deprecate outdated functionality, and make improvements without disrupting existing clients.
- Client flexibility: Different clients may have different requirements or may need specific features available in a particular version of the API.
ASP.NET Web API versioning
There are multiple approaches to API versioning in .NET 6. Here are two commonly used methods:
- URL-based versioning: the version number is included in the URL:
https://api.example.com/v1/products
https://api.example.com/v2/products - Header-based versioning: the version number is specified in a custom header in the HTTP request. For example:
GET /products HTTP/1.1
Host: api.example.com
Accept: application/json
X-API-Version: 2
Let’s take URL-based for example. First, you need to install a package:
Microsoft.AspNetCore.Mvc.Versioning
Then you need to configure the API versioning in Program.cs C# class:builder.Services.AddApiVersioning(options =>
Program.cs C# class:builder.Services.AddApiVersioning(options =>
 {
     	options.ReportApiVersions = true;
     	options.DefaultApiVersion = new ApiVersion(1, 0);
     	options.AssumeDefaultVersionWhenUnspecified = true;
     	options.ApiVersionReader = new UrlSegmentApiVersionReader();
});
- ReportApiVersions -> the API response will include information about the available versions and the version used for the current request
- DefaultApiVersion -> This option sets the default API version.
- AssumeDefaultVersionWhenUnspecified -> When set to true, if the client does not include a version in the request, the API will use the default version specified in DefaultApiVersion.
- ApiVersionReader -> It determines how the API version is extracted from the request. In this case, the API version is read from the URL segment.
In the ProductsController, you decorate the action methods with the MapToApiVersion attribute to specify the version for each method.
Clients can access different versions of the API by appending the version number to the URL, like /v1/products or /v2/products.
[ApiController]
 [Route("v{version:apiVersion}/products")]
 public class ProductsController : ControllerBase
 {
// GET v1/products
 [HttpGet]
 [MapToApiVersion("1.0")]
 public IActionResult GetV1()
 {
      	// Implementation for version 1
 }
// GET v2/products
 [HttpGet]
 [MapToApiVersion("2.0")]
 public IActionResult GetV2()
 {
    	// Implementation for version 2
 }
}
Based on my experience, use attribute-based routing for easier configuration and organization, stick to a consistent versioning strategy, thoroughly document each version to keep users informed, and prioritize backward compatibility to avoid disruptions for existing users.
Trust me, following these tips will make your API development in .NET 6 a breeze! :D
I would recommend you to read an official article by Microsoft about Versioning RESTful API.
Using proper HTTP Methods
What are HTTP methods?
HTTP methods, also known as HTTP verbs, are standardized actions or operations that can be performed on resources using the Hypertext Transfer Protocol (HTTP). These methods define the type of operation to be carried out on a specific resource requested by a client.
The most used methods are:
- GET: Retrieves a representation of a resource.
- POST: Creates a new resource.
- PUT: Updates an existing resource or creates a new resource if it doesn't exist.
- PATCH: Partially updates an existing resource.
- DELETE: Deletes a resource.
Why is using proper HTTP methods important?
Using proper HTTP methods is important because it ensures adherence to the principles of the REST architectural style, improves API design and maintainability, enhances security by enforcing appropriate access controls, promotes scalability and caching mechanisms, and enables interoperability and compatibility with various clients and servers across the web.
From my perspective, these 2 are the most important:
- RESTful principles: Properly using HTTP methods aligns with the principles of Representational State Transfer (REST). RESTful APIs leverage the semantics of these methods to create a uniform and predictable interface for clients.
- Semantic clarity: Each HTTP method carries a specific meaning, making your API endpoints more intuitive and self-explanatory. Developers can easily understand the purpose and functionality of an endpoint based on the HTTP method being used.
When to use each HTTP method?
- GET: Use GET to retrieve data from a resource. It should not have any side effects on the server.
- POST: Use POST to create a new resource. The request payload typically contains the data for the new resource, and the server assigns a unique identifier to it.
- PUT: Use PUT to update an existing resource or create a new resource if it doesn't exist. The request payload contains the complete representation of the resource being updated.
- PATCH: Use PATCH to perform a partial update on an existing resource. The request payload includes only the changes that need to be applied to the resource.
- DELETE: Use DELETE to delete a resource identified by its unique identifier.
Story time:
Let me share an amusing experience I had with HTTP methods while developing my .NET API. It all began when I mistakenly utilized the "GET" method instead of "POST" to submit user data. This led to a comical mix-up and confusion with the information.
As if that weren't enough, I encountered another blunder when I unintentionally set the "PUT" method instead of "DELETE" to remove a resource, resulting in persistent and stubborn data.
Lesson learned: always use the right HTTP methods, or you'll find yourself in a world of hilarious API mishaps!
.NET 6 Example
[ApiController]
[Route("products")]
public class ProductsController : ControllerBase
{
     // GET /products
    [HttpGet]
    public IActionResult Get()
    {
         // Implementation to retrieve all products
    }

    // GET /products/{id}
    [HttpGet("{id}")]
    public IActionResult GetById(int id)
    {
        // Implementation to retrieve a specific product by ID
    }

    // POST /products
    [HttpPost]
    public IActionResult Create(ProductDto product)
    {
        // Implementation to create a new product using the provided data
    }

    // PUT /products/{id}
    [HttpPut("{id}")]
    public IActionResult Update(int id, ProductDto product)
    {
        // Implementation to update an existing product identified by the ID
    }

    // PATCH /products/{id}
    [HttpPatch("{id}")]
    public IActionResult PartialUpdate(int id, JsonPatchDocument<ProductDto> patchDocument)
    {
        // Implementation to apply partial updates to an existing product
    }

    // DELETE /products/{id}
    [HttpDelete("{id}")]
    public IActionResult Delete(int id)
    {
        // Implementation to delete a specific product by ID
    }
}
Remember to choose the appropriate HTTP method based on the action you want to perform on a resource and follow the guidelines and best practices for each method.
Securing your API
Securing an API is crucial to protect sensitive data, prevent unauthorized access, and ensure the integrity of your application. It refers to the process of implementing measures and practices to protect an Application Programming Interface (API) from unauthorized access, data breaches, and other security risks. It involves implementing authentication, authorization, encryption, and other security mechanisms to ensure the confidentiality, integrity, and availability of the API and the data it handles.
When developing a .NET 6 Web API, there are several important aspects to consider for API security:
Authentication:
Implementing authentication is essential to prevent unauthorized access and protect sensitive resources. In .NET 6 Web API, you can utilize various authentication mechanisms such as JSON Web Tokens (JWT), OAuth, or custom authentication schemes.
JWT Bearer Token Example in .NET 6
// Program.cs
builder.Services.AddAuthentication(JwtBearerDefaults.AuthenticationScheme)
            .AddJwtBearer(options =>
            {
                options.TokenValidationParameters = new TokenValidationParameters
                {
                    ValidateIssuer = true,
                    ValidateAudience = true,
                    ValidateIssuerSigningKey = true,
                    ValidIssuer = "your_issuer",
                    ValidAudience = "your_audience",
                    IssuerSigningKey = new SymmetricSecurityKey(Encoding.UTF8.GetBytes("your_security_key"))
                };
            });
}
Authorization
Implementing authorization ensures that users have appropriate access rights to specific API endpoints or resources. In .NET 6 Web API, you can use authorization attributes like [Authorize] or policy-based authorization to control access.
// ProductsController.cs
[ApiController]
[Route("api/products")]
public class ProductsController : ControllerBase
{
    [HttpGet]
    [Authorize(Roles = "admin")]
    public IActionResult GetProducts()
    {
        // Implementation for retrieving products
    }

    [HttpPost]
    [Authorize]
    public IActionResult CreateProduct(ProductDto product)
    {
        // Implementation for creating a new product
    }
}
Here is a great playlist of YouTube videos for Authentication and Authorization.
Rate Limiting
Rate limiting helps prevent abuse, excessive traffic, and denial-of-service (DoS) attacks. It ensures fair usage of your API's resources and prevents it from being overwhelmed. Implement rate limiting techniques in your API, such as setting maximum request limits per client, IP address, or globally.
In .NET 6 you can achieve this using AspNetCoreRateLimit library.
Add dependencies in Program.cs file:
services.AddMemoryCache();
services.Configure<IpRateLimitOptions>(Configuration.GetSection("IpRateLimiting"));
services.AddSingleton<IIpPolicyStore, MemoryCacheIpPolicyStore>();
services.AddSingleton<IRateLimitCounterStore, MemoryCacheRateLimitCounterStore>();
services.AddSingleton<IRateLimitConfiguration, RateLimitConfiguration>();
and setup the Middleware:
app.UseIpRateLimiting();
Rate limiting rules you can configure in your appsettings.json file:
{
  "IpRateLimiting": {
    "EnableEndpointRateLimiting": true,
    "StackBlockedRequests": false,
    "RealIpHeader": "X-Forwarded-For",
    "ClientIdHeader": "X-ClientId",
    "HttpStatusCode": 429,
    "GeneralRules": [
      {
        "Endpoint": "*",
        "Period": "1s",
        "Limit": 5
      }
    ]
  }
}
Caching responses
What is Response Caching?
Response caching involves storing the response of an API request and serving it directly from the cache when the same request is made again. By caching responses, you can reduce the need to reprocess the same request multiple times, resulting in faster response times and improved scalability.
Why use Response Caching?
You should use response caching to maximize the performance and scalability of your API, enhance user experience by reducing response time, improve overall responsiveness, alleviate server load, optimize network bandwidth consumption, and ensure availability, ultimately leading to an efficient and high-performing API system.
I will explain you the most 3 powerful reasons from my experience:
- Improved Performance: Instead of executing the same expensive computations or database queries repeatedly, the cached response is served swiftly from memory or a cache store. Caching responses reduces the response time and improves the overall performance of your API.
- Bandwidth Savings: Instead of transmitting the entire response each time, subsequent requests can fetch the cached response, saving bandwidth. Caching responses reduces the amount of data sent over the network.
- Reducing Server Load: By serving cached responses, your server handles fewer requests, resulting in reduced server load and improved scalability. This is especially beneficial when dealing with high-traffic or resource-intensive APIs.
.NET Implementation
To enable response caching in a .NET 6 Web API, you can use the built-in ResponseCaching middleware and the [ResponseCache] attribute.
Add dependency:
services.AddResponseCaching()

Add Middleware:

app.UseResponseCaching();
Using in controller:
[ApiController]
[Route("api/products")]
public class ProductsController : ControllerBase
{
    [HttpGet]
    [ResponseCache(Duration = 60, VaryByQueryKeys = new[] { "category" })]
    public IActionResult GetProducts(string category)
    {
        // Implementation to retrieve and return products
    }
}
In this example, the ResponseCache attribute is applied to the GetProducts action in the ProductsController. The Duration property specifies the caching duration in seconds (60 seconds in this case), and the VaryByQueryKeys property indicates that the response should be cached separately for different values of the "category" query parameter.
Microsoft Learn has a great guideline on response caching.
User Input Validation
What is User Input Validation?
User input validation is the process of checking and validating the data entered by users before accepting and processing it in the API. It involves verifying the format, type, and integrity of the input to prevent common security vulnerabilities. You can secure your application from vulnerabilities such as SQL Injection, XSS (Cross-Site Scripting), or command injection attacks.
Why use User Input Validation?
You probably should use user input validation to ensure data integrity and accuracy, enhance the security of your application by preventing potential vulnerabilities, improve the user experience by providing prompt feedback and preventing errors, and ultimately create a reliable, secure, and user-friendly application.
Top 3 reasons you should know about (The 3rd one is my favorite):
- Data Integrity: By validating user input, you can enforce business rules, data constraints, and specific formatting requirements. This helps maintain the integrity and consistency of your data.
- Security Vulnerabilities Prevention: User input validation helps protect your API against common security risks by detecting and rejecting malicious or malformed input. It ensures that the data processed by your API is trustworthy and safe to handle.
- Error Handling: Validating user input allows you to provide meaningful error messages and responses when invalid input is detected. This helps users understand and correct their input, leading to a better user experience.
.NET Web Api Example
[ApiController]
[Route("api/products")]
public class ProductsController : ControllerBase
{
    [HttpPost]
    public IActionResult CreateProduct([FromBody] ProductDto product)
    {
        if (!ModelState.IsValid)
        {
            return BadRequest(ModelState);
        }
        // Implementation to create a new product
    }
}

// ProductDto.cs
public class ProductDto
{
    [Required]
    public string Name { get; set; }
    [Range(0, 100)]
    public int Quantity { get; set; }
    // Other properties and validation attributes
}
Exception Handling
What is Exception Handling?
Exceptions can arise due to various reasons, such as programming errors, invalid inputs, or external dependencies. Proper exception handling allows you to handle errors, recover from failures, and provide responses to clients. Exception handling is the process of managing and responding to unexpected situations that occur during the execution of your API code.
Why use Exception Handling?
Firstly, Exception handling allows for proper error management and graceful handling of unexpected situations that may arise during the execution of a program. By catching and handling exceptions, you can prevent the application from crashing and provide meaningful error messages to users or log them for troubleshooting purposes.
Secondly, exception handling helps in separating normal program flow from error handling logic, making the code more organized, readable, and maintainable. It also promotes code reuse by encapsulating error handling logic in reusable exception handling blocks.
Summarized in 3 reasons:
- Prevent Unhandled Exceptions: You can catch and handle exceptions before they propagate up the call stack and cause unhandled exceptions, resulting in unpredictable behavior or crashes.
- “Graceful” Error Handling: It helps provide meaningful error responses to clients, improving the user experience.
- Debugging and Logging: Properly logged exceptions provide valuable insights into the causes of errors and assist in troubleshooting.
How to implement Global Exception Handling Middleware in .NET 6?
In this example, the global exception handling middleware is added in the Program.cs file. It redirects unhandled exceptions to the HandleError action of the ErrorController, where you can log the error and return a standardized error response to the client.
Middleware:
[ApiController]
[Route("/error")]
[ApiExplorerSettings(IgnoreApi = true)]
public class ErrorController : ControllerBase
{
    [Route("{statusCode}")]
    public IActionResult HandleError(int statusCode)
    {
        // Log the error and provide a meaningful error response
        var errorResponse = new ErrorResponse
        {
            StatusCode = statusCode,
            Message = "An error occurred."
        };

        return StatusCode(statusCode, errorResponse);
    }

    [Route("")]
    public IActionResult HandleError()
    {
        // Log the error and provide a meaningful error response
        var errorResponse = new ErrorResponse
        {
            StatusCode = 500,
            Message = "An error occurred."
        };

        return StatusCode(500, errorResponse);
    }
}
Find even more best practices for exception handling specifically on Microsoft's Learn platform about exceptions and best practices.
Documenting your API
What’s the meaning of “Documenting API.”?
"Documenting an API" refers to the process of creating comprehensive and informative documentation that describes the functionality, usage, and specifications of an Application Programming Interface (API). When you create an API, someone will use that API. The one who uses the API should have an intuitive insight into the endpoints, requests, and responses that will be used. Good documentation enables developers to easily consume your API, reduces integration time, and promotes developer satisfaction.
Why document an API?
One of the main reasons why you should document your APIs is to provide clear instructions and guidelines for developers.
I can give you 2 more reasons:
- Third-Party Integration: Documentation is crucial when you want other developers or organizations to integrate their applications or services with your API. It serves as a foundation for understanding the integration requirements, data formats, and authentication mechanisms.
- Improved Usability: Well-documented APIs provide clear instructions and examples on how to make requests, handle responses, and utilize available features. This leads to more effective usage of the API and reduces the chance of errors or misunderstandings.
Document your API in .NET 6 with Swagger
There are a handful of tools and libraries that can help you document your API. At the end of the day, you can do it yourself (which I don't recommend if you don't have a lot of time).
Swagger is a library that is widely used in ASP.NET Web API projects. VIdeces is in almost every API project you come across. Learn more: https://swagger.io/solutions/api-development/
It is quite simple to configure Swagger.
Add Swagger to the dependency injection:
builder.Services.AddSwaggerGen(c =>{
c.SwaggerDoc("v1", new OpenApiInfo { Title = "My API", Version = "v1" });
});
Add Middleware for Swagger and for Swagger UI to display and interact with generated documentation:
app.UseSwagger();
app.UseSwaggerUI(c =>
{
c.SwaggerEndpoint("/swagger/v1/swagger.json", "My API v1");
});
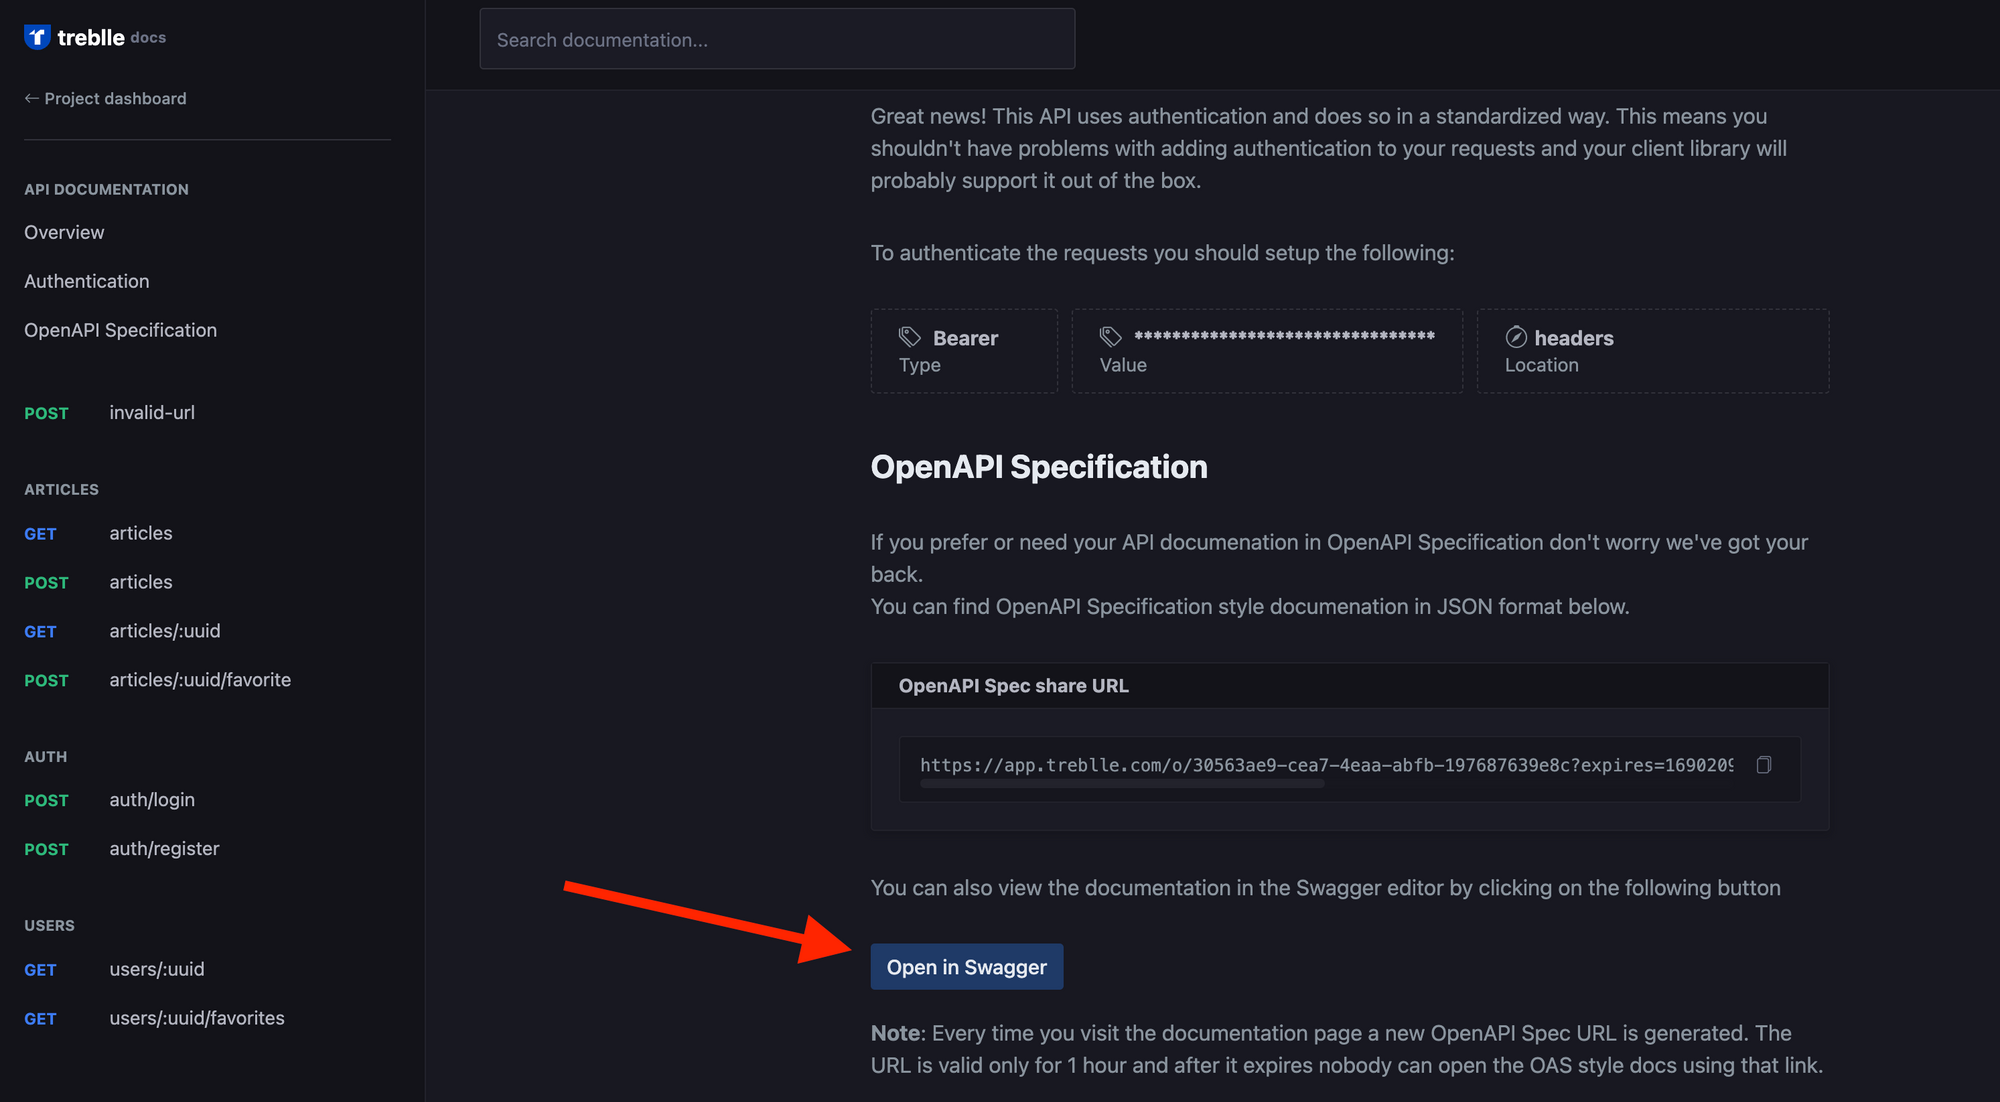
API Documenting Made Easy
Married to how Swagger looks? No worries. Treblle's feature that autogenerates your API in real time has the option to open it Swagger since Treblle is a part of the Open APISpec initiative.
Conclusion
In conclusion, this guide aims to introduce you to the best practices for developing a Web API project using .NET 6. By following these practices, you can ensure a secure, scalable, and maintainable API that meets the needs of your users and clients. While these practices are specifically tailored to .NET 6, many of them can be applied to other frameworks as well, giving them valuable knowledge for any API development endeavor.